Drupal 8 プラグイン その 2: プラグインデリバティブの作り方
前回に引き続き CMS 「 Drupal 」のプラグインについて解説します。
前回はプラグインとは何ぞやという概念的な部分とプラグインの作り方について説明しました。
今回はプラグインシステムのいち機能である「 プラグインデリバティブ 」について解説してみたいと思います。 今回も概念的な説明をした後に実例を紹介し最後に実際の作り方をご説明します。
対象の Drupal のバージョンは本稿執筆時点で最新の Drupal 8.3.2 です。 バージョンが進むと実装方法が変わるかもしれないのでその点にご注意ください。
想定読者
今回の想定読者は Drupal 7 以前の Drupal になじみのある方 です。 「エンティティ」「ブロック」「 Views ビュー」などの Drupal の概念を読者は知っていることを前提としています。
さっそく概念的な説明から見ていきましょう。
プラグインデリバティブとは
Drupal 8 のプラグインデリバティブとはかんたんに言うと「 1 つのプラグインクラスから複数のプラグインを生成するための仕組み 」のことです。 通常プラグインクラスとプラグインの関係は 1:1 ですが、プラグインデリバティブの仕組みを使うとこれを 1:n の関係に変えることができます。
Drupal.org ( d.o. )では次のように説明されています。
Derivatives provide a simple way to expand a single plugin so that it can represent itself as multiple plugins in the user interface. This is done by creating a separate class for this purpose and referencing it appropriately in your plugin definition.
(意訳)プラグインデリバティブはひとつのプラグインをユーザインタフェース上複数のプラグインとして表現するようにプラグインを拡張するシンプルな方法を提供します。 プラグインクラスとは別のクラスを作成してプラグイン定義の中で適切に指定することで実現することができます。
ということで、プラグインデリバティブを使えば「ひとつのプラグインクラスから複数のプラグインが作れる」ということはわかりました。 では、ひとつのプラグインクラスから複数のプラグインが生成できると何がうれしいのでしょうか。
プラグインデリバティブを使いたくなるケースのひとつは ほんの一部分だけ機能が異なる似たプラグインをまとめて大量に生成したいケース です。 特に画面から入力された設定などに応じてプラグインを動的に増やしたい場合などはプラグインデリバティブが有用です。
おそらくプラグインデリバティブの使いどころとして最も多いのは「 あるタイプのエンティティが増えるとそれに伴ってプラグインが動的に生成される 」というような作りです。 個人的にはプラグインデリバティブはまさにこのために作られたものだという気がします。
抽象的な説明だけでは何のことやらよくわかりませんよね。 具体例を見てみましょう。
プラグインデリバティブの例: Views ブロック
プラグインデリバティブが使われている例のひとつに Drupal コアの Views のブロックがあります。
Views のシステムでは、ブロックディスプレイを持つビューを管理画面から追加するとそれに対応するブロックが自動で追加されるようになっています。 ビューを追加すると対応するブロックが自動的に作成され、削除すると対応するブロックも自動的に削除されます。
Drupal 8 ではこの動的な自動追加 / 削除の仕組みにプラグインデリバティブが使用されています。
Drupal 8 において Views ビューはエンティティでありブロックはプラグインなので、この例はそのまま上の「あるタイプのエンティティが増えるとそれに伴ってプラグインが動的に生成される」パターンにあてはまります。
ちなみに Views ブロックの場合の実際のプラグインクラスはそれぞれ次のとおりです。
- プラグインのクラス:
\Drupal\views\Plugin\Block\ViewsBlock - デリバティブを生成するクラス(プラグインデライバー):
Drupal\views\Plugin\Derivative\ViewsBlock
それぞれのクラスの中身をポイントを絞って見ておきましょう。
Drupal\views\Plugin\Block\ViewsBlock:
namespace Drupal\views\Plugin\Block;

use Drupal\Component\Utility\Xss;
use Drupal\Core\Form\FormStateInterface;
use Drupal\views\Element\View;
use Drupal\Core\Entity\EntityInterface;

/**
 * Provides a generic Views block.
 *
 * @Block(
 *   id = "views_block",
 *   admin_label = @Translation("Views Block"),
 *   deriver = "Drupal\views\Plugin\Derivative\ViewsBlock"
 * )
 */
class ViewsBlock extends ViewsBlockBase {

  // 省略

}
プラグインクラスもデライバークラスもクラス名が同じなのでわかりにくいですが、こちらはプラグインクラスの方です。
ポイントは docblock の中のプラグインアノテーション @Block の中に deriver = ... という行があり、こちらで対応するプラグインデライバークラスが指定されているところです。
deriver (デライバー)というのはなんだか耳慣れないことばえすが、 derivative (デリバティブ)を生成するクラスなのでデライバーということなのでしょう。
デライバーのクラスの方も見てみましょう。
\Drupal\views\Plugin\Derivative\ViewsBlock:
namespace Drupal\views\Plugin\Derivative;

use Drupal\Core\Entity\EntityStorageInterface;
use Drupal\Core\Plugin\Discovery\ContainerDeriverInterface;
use Drupal\Core\StringTranslation\TranslatableMarkup;
use Symfony\Component\DependencyInjection\ContainerInterface;

/**
 * Provides block plugin definitions for all Views block displays.
 *
 * @see \Drupal\views\Plugin\Block\ViewsBlock
 */
class ViewsBlock implements ContainerDeriverInterface {

  /**
   * List of derivative definitions.
   *
   * @var array
   */
  protected $derivatives = [];

  // 省略

  /**
   * {@inheritdoc}
   */
  public function getDerivativeDefinitions($base_plugin_definition) {
    // Check all Views for block displays.
    foreach ($this->viewStorage->loadMultiple() as $view) {

      // 省略

    }
    return $this->derivatives;
  }

}
こちらのポイントはメソッド getDerivativeDefinitions() とプロパティ $derivatives です。
getDerivativeDefinitions() の中でブロックディスプレイを持つビューが集められ $derivatives に格納されています。
デライバーを使って動的に作られたプラグインデリバティブは通常のプラグインと同じようにプラグインマネージャを使って取得することができます。
// プラグインデリバティブを含むすべてのブロック定義を取得する
$plugin_manager = Drupal::service('plugin.manager.block');
$block_definitions = $plugin_manager->getDefinitions();
このあたりについては後ほど実際にプラグインデリバティブを作るときにもう少し詳しく説明します。
Drupal コアのその他のプラグインデリバティブ
コアには他にもプラグインデライバーを使って動的に生成されているプラグインがいくつかあります。 例えば、アノテーションで定義するプラグインタイプの場合だと、以下のプラグインにプラグインデライバーが備わっています(「プラグインクラス: プラグインデライバークラス」という形で書いています)。
block_content\Plugin\Block\BlockContentBlock:Drupal\block_content\Plugin\Derivative\BlockContentlanguage\Plugin\Block\LanguageBlock:Drupal\language\Plugin\Derivative\LanguageBlockmigrate\Plugin\migrate\destination\Entity:Drupal\migrate\Plugin\Derivative\MigrateEntitymigrate\Plugin\migrate\destination\EntityRevision:Drupal\migrate\Plugin\Derivative\MigrateEntityRevisionrest\Plugin\rest\resource\EntityResource:Drupal\rest\Plugin\Deriver\EntityDeriversystem\Plugin\Block\SystemMenuBlock:Drupal\system\Plugin\Derivative\SystemMenuBlockviews\Plugin\Block\ViewsBlock:Drupal\views\Plugin\Derivative\ViewsBlockviews\Plugin\Block\ViewsExposedFilterBlock:Drupal\views\Plugin\Derivative\ViewsExposedFilterBlockviews\Plugin\views\argument_validator\Entity:Drupal\views\Plugin\Derivative\ViewsEntityArgumentValidatorviews\Plugin\views\row\EntityRow:Drupal\views\Plugin\Derivative\ViewsEntityRowviews\Plugin\views\wizard\Standard:Drupal\views\Plugin\Derivative\DefaultWizardDeriver
また、メニューリンクやアクションリンクまわりでもプラグインデライバーがちょこちょこ使われています。 プラグインデライバーが実際にどのように使われているのかを知りたい場合はそのあたりのコードを読むとよいでしょう。
プラグインデリバティブの作り方
では最後にプラグインデリバティブの作り方を見ていきましょう。
今回はお題として「コンテンツエンティティのエンティティタイプのメタ情報を表示するブロック」を作ってみます。 ノード、ユーザ、タームなどエンティティタイプごとに 1 つずつブロックが提供されるものを作ります。 コンテンツタイプそのものがコンフィグエンティティなので、これはまさに上で述べた「あるタイプのエンティティが増えるとそれに伴ってプラグインが動的に生成される」というパターンにあてはまります。
作成のステップは以下のとおりです。
- 下準備: モジュールを作る
- 本作業: プラグインクラスを作る
- 本作業: プラグインデライバークラスを作る
- 確認: 確認する
では順番に見ていきましょう。
1. 下準備: モジュールを作る
前回の記事で見たとおり、プラグインはモジュールの中で定義する形になっています。 プラグインを作るにはその容れ物となるモジュールが必要なので先にモジュールを作成しましょう。
modules/custom/mymodule/mymodule.info.yml:
name: My Module
type: module
core: 8.x
名前は何でもよいのですが、今回はマシン名を mymodule 、人間向けの名称を My Module とします。
モジュールを表す .info.yml ファイルが作成できたら管理画面などからモジュールを有効化しましょう。
モジュールが有効化できたら次のステップへと進みます。
2. 本作業: プラグインクラスを作る
モジュールの準備ができたら最初にプラグインクラスを作ります。
プラグインデリバティブを利用したプラグインを作る場合も、プラグインクラス本体の部分は通常のプラグインとやり方は同じです。
クラスファイルの配置場所は通常のプラグインと同じく対象のプラグインタイプのプラグインマネージャーで指定されているとおりにします。
ブロックの場合は モジュールディレクトリ/src/Pugin/Block となっています。
core/lib/Drupal/Core/Block/BlockManager.php:
public function __construct(\Traversable $namespaces, CacheBackendInterface $cache_backend, ModuleHandlerInterface $module_handler) {
  parent::__construct('Plugin/Block', $namespaces, $module_handler, 'Drupal\Core\Block\BlockPluginInterface', 'Drupal\Core\Block\Annotation\Block');

  // 省略
}
では実際のコードを見てみましょう。
modules/custom/mymodule/src/Plugin/Block/ContentEntityInfoBlock.php:
namespace Drupal\mymodule\Plugin\Block;

use Drupal\Core\Block\BlockBase;
use Drupal\Core\Entity\EntityTypeManagerInterface;
use Drupal\Core\Plugin\ContainerFactoryPluginInterface;
use Drupal\Core\Session\AccountInterface;
use Symfony\Component\DependencyInjection\ContainerInterface;

/**
 * Provides blocks for content entity information.
 *
 * @Block(
 *   id = "mymodule_content_entity_info_block",
 *   admin_label = @Translation("Content Entity Info"),
 *   category = @Translation("My Module"),
 *   deriver = "Drupal\mymodule\Plugin\Derivative\ContentEntityInfoBlock",
 * )
 */
class ContentEntityInfoBlock extends BlockBase implements ContainerFactoryPluginInterface {

  /**
   * Entity type manager.
   *
   * @var Drupal\Core\Entity\EntityTypeManagerInterface
   */
  protected $entityTypeManager;

  /**
   * {@inheritdoc}
   */
  public function __construct(array $configuration, $plugin_id, $plugin_definition, EntityTypeManagerInterface $entity_type_manager) {
    parent::__construct($configuration, $plugin_id, $plugin_definition);
    $this->entityTypeManager = $entity_type_manager;
  }

  /**
   * {@inheritdoc}
   */
  public static function create(ContainerInterface $container, array $configuration, $plugin_id, $plugin_definition) {
    return new static(
      $configuration,
      $plugin_id,
      $plugin_definition,
      $container->get('entity_type.manager')
    );
  }

  /**
   * {@inheritdoc}
   */
  public function build() {
    $entity_type_name = $this->getDerivativeId();

    // If the entity type is not found, explain that.
    if (!$this->entityTypeManager->hasDefinition($entity_type_name)) {
      return [
        '#markup' => $this->t('Entity type "@type" is not found.', [
          '@type' => $entity_type_name,
        ]),
      ];
    }

    // If the entity type is found, show the meta info in a table.
    $definition = $this->entityTypeManager->getDefinition($entity_type_name);
    $translatable = $this->t($definition->isTranslatable() ? 'yes' : 'no');
    $rows = [
      [$this->t('Name'), $definition->getLabel()],
      [$this->t('Class'), $definition->getClass()],
      [$this->t('Base table'), $definition->getBaseTable()],
      [$this->t('Data table'), $definition->getDataTable()],
      [$this->t('Translatable'), $translatable],
      [$this->t('Permission granularity'), $definition->getPermissionGranularity()],
      [$this->t('Bundle label'), $definition->getBundleLabel()],
    ];

    return [
      '#type' => 'table',
      '#rows' => $rows,
    ];
  }

}
ポイントはクラスのコメント内にあるアノテーションです。
/**
 * Provides blocks for content entity information.
 *
 * @Block(
 *   id = "mymodule_content_entity_info_block",
 *   admin_label = @Translation("Content Entity Info"),
 *   category = @Translation("My Module"),
 *   deriver = "Drupal\mymodule\Plugin\Derivative\ContentEntityInfoBlock",
 * )
 */
上の ViewsBlock の例で見たとおり、ブロックプラグインの場合は deriver でデライバークラスを指定します。
ここではクラス Drupal\mymodule\Plugin\Derivative\ContentEntityInfoBlock を指定してしますがこれは未作成です。
次のステップで作成するつもりです。
ちなみに、インタフェース Drupal\Core\Plugin\ContainerFactoryPluginInterface を実装している理由は、エンティティタイプのメタ情報を取得するためにエンティティタイプマネジャーサービスを DI で取得しておくためであり、特に深い意味はありません。
その他、プラグインクラスが実装すべきインタフェースやアノテーションの仕様については前回の記事で説明したとおりなので、興味のある方はそちらをご覧ください。
ちなみにプラグインのクラス名は自由につけることができるので、チームで共通の命名ルールを定めておいて読む人にわかりやすい名前にするのがよいでしょう。
今回はコンテンツエンティティのエンティティタイプのメタ情報を表示するためのブロックを作るので、クラス名は ContentEntityInfoBlock としました。
3. 本作業: プラグインデライバークラスを作る
続いてプラグインデリバティブを生成するロジックを格納するデライバークラスを作成します。
プラグインデライバーは所定のインタフェース \Drupal\Component\Plugin\Derivative\DeriverInterface を実装する必要があります。
このインタフェースのメソッドは次の 2 つです。
public function getDerivativeDefinition($derivative_id, $base_plugin_definition);public function getDerivativeDefinitions($base_plugin_definition);
これらをゼロから実装するのでもよいですが、プラグインデライバーを作る場合は一般的な機能を実装したベースクラス Drupal\Component\Plugin\Derivative\DeriverBase を継承する形が一般的です。
Drupal\Component\Plugin\Derivative\DeriverBase を継承すれば getDerivativeDefinition() は実装しなくてもよくなるので、実装すべきはただひとつ getDerivativeDefinitions() のみです。
今回は Drupal\Component\Plugin\Derivative\DeriverBase を使って実装しましょう。
クラスを格納するファイルの配置場所は モジュールディレクトリ/Plugin/Derivative としていますが、こちらについては厳密なルールはないようなので共通ルールを決めてわかりやすいと思われる場所に配置すればよいでしょう。
実際のコードは次のとおりです。
modules/custom/mymodule/src/Pugin/Derivative/ContentEntityInfoBlock.php:
namespace Drupal\mymodule\Plugin\Derivative;

use Symfony\Component\DependencyInjection\ContainerInterface;
use Drupal\Component\Plugin\Derivative\DeriverBase;
use Drupal\Core\Plugin\Discovery\ContainerDeriverInterface;
use Drupal\Core\Entity\ContentEntityTypeInterface;
use Drupal\Core\Entity\EntityTypeManagerInterface;
use Drupal\Component\Render\FormattableMarkup;

/**
 * Defines deriver for ContentEntityInfoBlock.
 */
class ContentEntityInfoBlock extends DeriverBase implements ContainerDeriverInterface {

  /**
   * Entity type manager.
   *
   * @var Drupal\Core\Entity\EntityTypeManagerInterface
   */
  protected $entityTypeManager;

  /**
   * Construct an instance.
   */
  public function __construct(EntityTypeManagerInterface $entity_type_manager) {
    $this->entityTypeManager = $entity_type_manager;
  }

  /**
   * {@inheritdoc}
   */
  public static function create(ContainerInterface $container, $base_plugin_id) {
    return new static(
      $container->get('entity_type.manager')
    );
  }

  /**
   * {@inheritdoc}
   */
  public function getDerivativeDefinitions($base_plugin_definition) {
    $entity_types = $this->entityTypeManager->getDefinitions();
    foreach ($entity_types as $name => $entity_type) {
      if ($entity_type instanceof ContentEntityTypeInterface) {
        $this->derivatives[$name] = $base_plugin_definition;
        $this->derivatives[$name]['admin_label'] = new FormattableMarkup('@group: @entity_type', [
          '@group' => $base_plugin_definition['admin_label'],
          '@entity_type' => $entity_type->getLabel(),
        ]);
      }
    }

    return $this->derivatives;
  }

}
このクラスのポイントはもちろん getDerivativeDefinitions() メソッドです。
getDerivativeDefinitions() は対象のプラグインに対応するプラグインデリバティブの定義を連想配列で返すことが期待されています。
引数の $base_plugin_definition にプラグインの定義はひととおり含まれているので基本的にはそれを利用して、プラスアルファで各プラグインデリバティブの個別の情報を加えていく形で各プラグインデリバティブの定義を生成します。
今回はコンテンツエンティティのエンティティタイプのメタ情報を表示するブロックを作りたかったので、ここではシステム内に定義されたすべてのコンテンツエンティティタイプを取得して「 1 エンティティタイプ = 1 プラグインデリバティブ」となるようにプラグインデリバティブ(つまりブロック)を生成しています。
ここまでこればプラグインデリバティブを利用したプラグインの作成は完了です。
ここまでの作業が終われば .info.yml ファイル 1 つと .php ファイル 2 つ、合計 3 つのファイルが作れているはずです。
- modules/
  - custom/
    - mymodule/
      - mymodule.info.yml
        - src/
          - Plugin/
            - Block/
              - ContentEntityInfoBlock.php
            - Derivative/
              - ContentEntityInfoBlock.php
これでプラグインデライバーで生成されたプラグインが利用できるようになっているはずです。 最後に結果を確認しておきましょう。
4. 確認: 確認する
作業がひととおり終わったら作成できたプラグインを確認します。
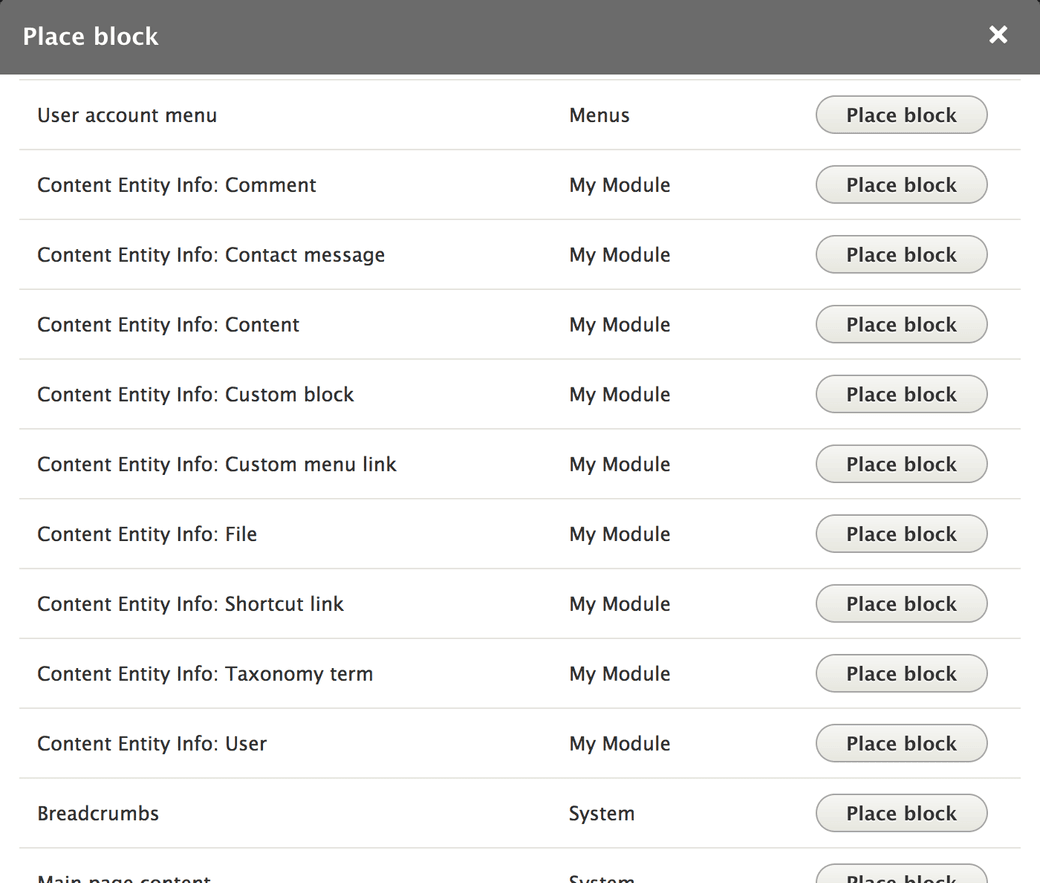
ブロックプラグインの場合、 1 つのプラグインはそのまま 1 つのブロックとして表されるので、上のコードからはコンテンツエンティティタイプの数だけそのメタ情報を表すためのブロックが生成されているはずです。
管理画面などからキャッシュをクリア(再構築)してブロックレイアウトのページ( /admin/structure/block )を開きましょう。
どこかのリージョンにブロックを追加しようとすると、利用可能なすべてのブロックが表示されます。
この中にエンティティタイプの情報を表示するためのブロックがコンテンツエンティティタイプの数だけ表示されていれば OK です。

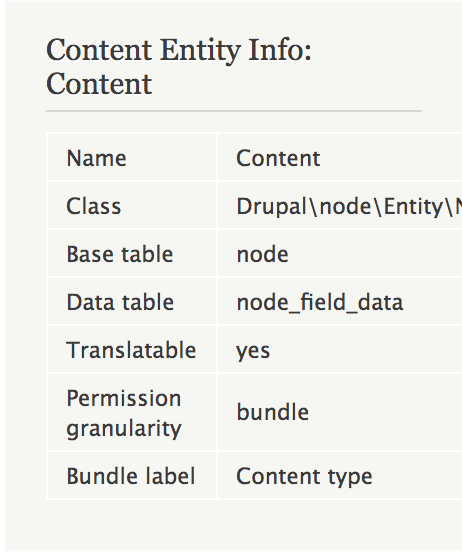
ちなみにこのブロックのうちノードに関するブロックを実際にリージョンに配置するとテーブル形式でメタ情報を表示するブロックが描画されます。

以上です。
おわりに
今回は Drupal 8 のプラグインデリバティブの概念と実例、作り方をご紹介してみました。
通常のプラグインに比べると使いどころの少ないプラグインデリバティブではありますが、適切な場所でうまく使えるととても便利です。 Drupal 8 を使いこなしたい方は押さえておくとよいのではないでしょうか。
ちなみに余談ですが、プラグインデリバティブの前身(= Drupal 7 におけるプラグインデリバティ相当のもの)は ctools モジュールの チャイルドプラグイン です(私自身実装したことはありません)。
参考
プラグインデリバティブについて理解を深めたい方には以下のページなどが役に立ちます。 ただし、(これは Drupal 8 のリソース全般に言えることですが)情報が古くなっていて最新のバージョンにはあてはまらない部分もあるため、「ドキュメントはあくまでも参考程度に」と思って読むことをおすすめします。
参考
- Plugin API | core.api.php | Drupal 8.3.x | Drupal API
- Hooks exposing plugins have been replaced with true plugins | Drupal.org
- Introduce Plugin System to Core [#1497366] | Drupal.org
- Changed definition of plugin derivatives | Drupal.org
- Plugin Derivatives | Drupal.org
- Unraveling the Drupal 8 Plugin System | Drupalize.Me